Getting Started with a new Embedded System
For a desktop PC you can usually just download a generic Linux iso image and install it on your off the shelf hardware. This is unfortunately not the case for embedded systems. The variations in the embedded space are much bigger and the use cases differ a lot. Generic solutions are still rare and it is a safe bet that you have to do additional work to get your chosen or even customized hardware platform to work properly with your software stack.
In this blog post I describe on the example of the Raspberrry Pi 4 the typical steps to get started with a new embedded system. Embedded systems got complicated over time and it would be a waste of resources to start a new project from scratch. Instead you typically buy an evaluation kit or even a system on module that already comes with a decent board support package. Given the evaluation kit and the board support package you can start to do the first software development steps and at the same time the hardware engineers can start to design a hardware platform that fulfills the project specific requirements (e.g. size, IO interfaces, etc.).
Let’s assume that your company already has a long track record of selling embedded systems and therefore there is a requirement to align the software stack of your new embedded device with the one of its predecessors. Most likely the vendor BSP will not fulfill this requirement and it is anyway not integrated into your CI/CD toolchain. This is the moment to take a close look at the existing vendor BSP and to figure out the right modifications you have to do on your software stack in order to support the new hardware generation.
In this blog post we will learn how we turn
- the Raspberrry Pi 4 and its
- Raspbian operating system
into a customized embedded system that
- comes with a lean Debian arm64 operating system image with
- full over the air update support and
- a state of the art development toolchain highly suitable for continuous integration and delivery.
In comparison to yocto the Debian workflow differs quite a lot. Here is an overview picture that will be used to explain the key steps:
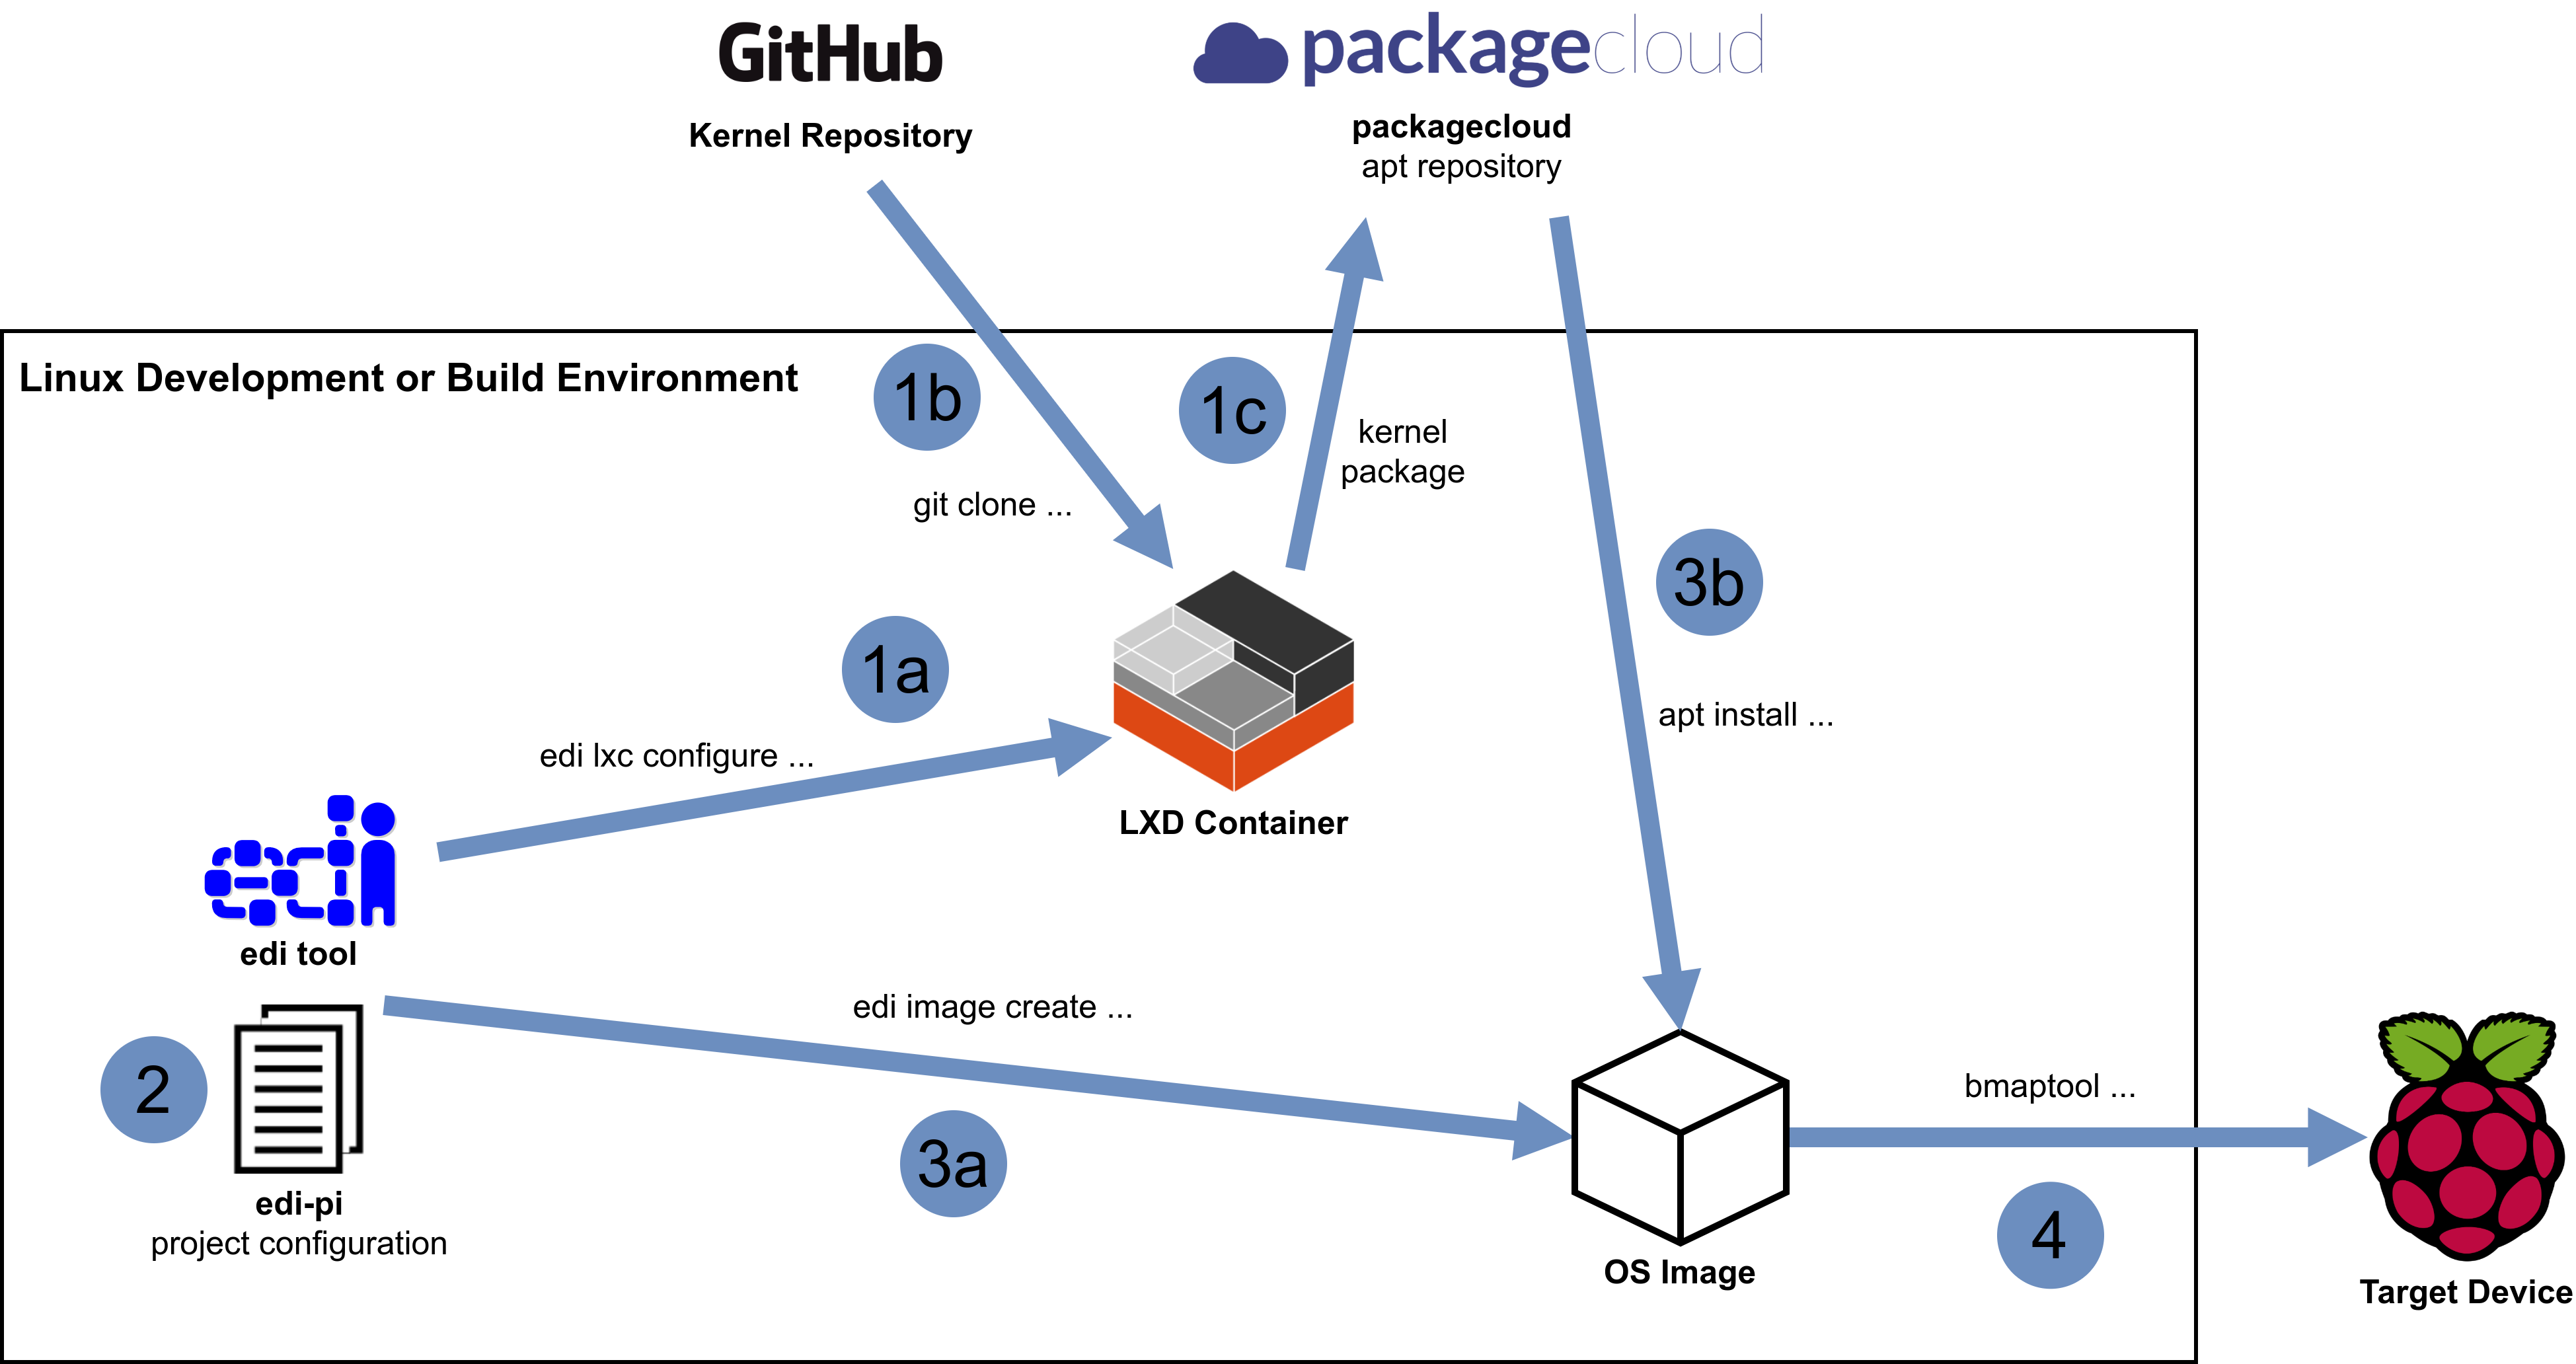
Linux Kernel
First of all we need a suitable Linux kernel for our new device. As a matter of fact Linux mainline support is usually not available for brand new hardware and therefore we have to fetch the Linux kernel source code with some vendor patches and compile it for our device. To speed up the build process we will cross compile the kernel on our development workstation. To get a reproducible build toolchain that can also be used for continuous integration we create a suitable container using the edi-pi configuration (please carefully follow the edi installation instructions in case you are using edi for the first time).
The edi-pi configuration requires some additional preparation steps documented here.
Now we can create the cross development container (step 1a):
mkdir -p ~/edi-workspace && cd ~/edi-workspace
git clone https://github.com/lueschem/edi-pi.git
cd edi-pi
sudo edi -v lxc configure edi-pi-cross-dev-buster pi-buster-arm64-cross-dev.yml
Once the container setup has been finished we can retrieve the ip address of the container and enter it:
IP_OF_CONTAINER=$(lxc exec edi-pi-cross-dev-buster ip addr show eth0 | grep "inet\b" | awk '{print $2}' | cut -d/ -f1)
ssh ${IP_OF_CONTAINER}
For the kernel compilation within the container we need some additional packages:
sudo apt install build-essential bc kmod cpio flex cpio libncurses5-dev bison libssl-dev wget lzop git
Finally we clone the “vendor specific” Linux kernel tree (step 1b):
mkdir -p ~/edi-workspace/rpi4-kernel && cd ~/edi-workspace/rpi4-kernel
git clone https://github.com/raspberrypi/linux.git
cd linux
And we configure and build a binary Debian kernel package:
git checkout raspberrypi-kernel_1.20200114-1
export ARCH=arm64
export CROSS_COMPILE=aarch64-linux-gnu-
make bcm2711_defconfig
make -j $(nproc) KBUILD_IMAGE=arch/arm64/boot/Image deb-pkg
Now we upload the resulting binary kernel Debian package
(~/edi-workspace/rpi4-kernel/linux-image-4.19.93-v8+_4.19.93-v8+-1_arm64.deb) to an apt repository server
(in our case packagecloud, step 1c).
Project Configuration
For your own project you would most likely fork edi-pi and start to adapt it according to your needs. In this example we skip the forking and just modify the existing project configuration (step 2).
The bootloader setup of the Raspberry Pi 4 has dramatically changed compared to its predecessors. Luckily other people have already done the heavy lifting to get U-Boot working on the Raspberry Pi 4. Here is the commit that makes use of this new U-Boot version.
Also the Broadcom bootloader requires an upgrade.
The configuration overlays allow us to add an additional board configuration for the Raspberry Pi 4.
The setup of the kernel command line gets done by adding an additional task to one of the Ansible playbooks.
As the device tree binary of the Raspberry Pi 4 gets modified by the Broadcom bootloader a change is required for the edi-boot-shim setup.
Finally we want to make use of the kernel we have just compiled before.
Target Image
After the above configuration modifications we are now perfectly prepared to generate a target image for the Raspberry Pi 4. Back on the host operating system we can start the image build (step 3a) that will fetch our new kernel (step 3b):
cd ~/edi-workspace/edi-pi
sudo edi -v image create pi4-buster-arm64.yml
Deployment
The resulting image can be copied to a SD card (here /dev/mmcblk0) using the following command (Please note that everything on the SD card will get erased!):
sudo bmaptool copy artifacts/pi4-buster-arm64.img /dev/mmcblk0
The resulting SD card can then be booted on a Raspberry Pi 4 (step 4).
Conclusion
This blog post outlined how you can adjust an edi based configuration in order to support a new embedded board type. The Raspberrry Pi 4 served as an example and thanks to its major changes compared to its predecessors a lot of typical integration steps have been demonstrated.
edi is by no means limited to the Raspberry Pi based hardware. The configuration setup can be easily adjusted for other hardware (e.g. i.MX or OMAP based) or extended for e.g. secure boot (less easy, only possible with appropriate hardware support).
Leave a comment