Rootless Creation of Debian OS and OCI Images
edi gets developed since eight years and in the meantime the tool landscape has considerably
evolved. It’s time to rethink the edi approach!
Here are the things I want to keep:
- Scalability: During my professional life
edihas proven that it is capable of dealing with very complex scenarios covering many different hardware types in a sometimes unfriendly corporate IT environment using one unified project configuration. - Digital twin: The use of containers as a digital twin of the operating system running on the real hardware has become an indispensable element for the developer workflow and CI setup.
- Ease of use: Ansible has made the OS customization approachable even for newbies.
- Compatibility:
edishall stay compatible with existing project configurations. - Reliability:
edihas proven to be a reliable partner even on build agents with limited resources. - Reproducibility: OS images get created from scratch in a reproducible manner.
- Debian: Debian has proven to be a very capable choice for my use cases.
Here is what I want to improve:
- Shareability I: OCI images have become the de-facto standard for sharing containers.
edishall fit into the OCI (Docker/Podman) ecosystem. - Shareability II: Building blocks like Ansible collections shall be easy to share between different
ediproject configurations. - Extensibility:
edishall become even more flexible for use cases that have not been foreseen so far. - Safety: Currently
edirequires superuser privileges to create OS images. A programming error could ultimately lead to a non-functioning host system. - Tooling: There are many new tools that fit very well into the
edi-based approach and can help to make a project configuration leaner.
After several months of evaluation and implementation, I am now ready to present the so-called edi-workflow v2!
Here is a walkthrough that can be easily reproduced on an Ubuntu 24.04 installation:
edi Installation
We install edi and a bunch of other tools as follows:
sudo add-apt-repository ppa:m-luescher/edi-snapshots
sudo apt update
sudo apt install buildah containers-storage crun curl distrobox dosfstools e2fsprogs edi fakeroot genimage git mender-artifact mmdebstrap mtools parted python3-sphinx python3-testinfra podman rsync zerofree
At a later stage we will need an ssh key pair to access the target device. With the following command we double-check if a key pair is already available:
ls -al ~/.ssh
In case there is none, we create one:
ssh-keygen -t ed25519 -C "you@example.com"
Creating an OS Image for the Raspberry Pi 4
To build an OS image for the Raspberry Pi 4 we need to clone an edi project configuration:
mkdir -p ~/edi-workspace/ && cd ~/edi-workspace/
git clone --recursive https://github.com/lueschem/edi-pi.git
cd edi-pi
Optional: As we want to connect the target device to a hosted Mender instance, we add our tenant token
(mender_tenant_token) to the Mender configuration (configuration/mender/mender.yml).
Now we create the Raspberry Pi 4 OS image:
edi -v project make pi4-gitops-v2.yml
Rootless image build!
The
ediv2 workflow no longer requires superuser privileges to build OS images.
Finally, we flash the resulting image to an SD card (here /dev/sdb, everything on the SD card will be erased!):
sudo umount /dev/sdb?
sudo dd if=artifacts/pi4-gitops-v2.img of=/dev/sdb bs=4M conv=fsync status=progress
genimageThe
ediv1 workflow uses a bash script to transforms a root file system into a bootable image. The toolgenimageprovides a much cleaner approach and it works even without superuser privileges.
Once the Raspberry Pi has booted up, we access it using ssh:
ssh pi@IP_ADDRESS
Workflow v2
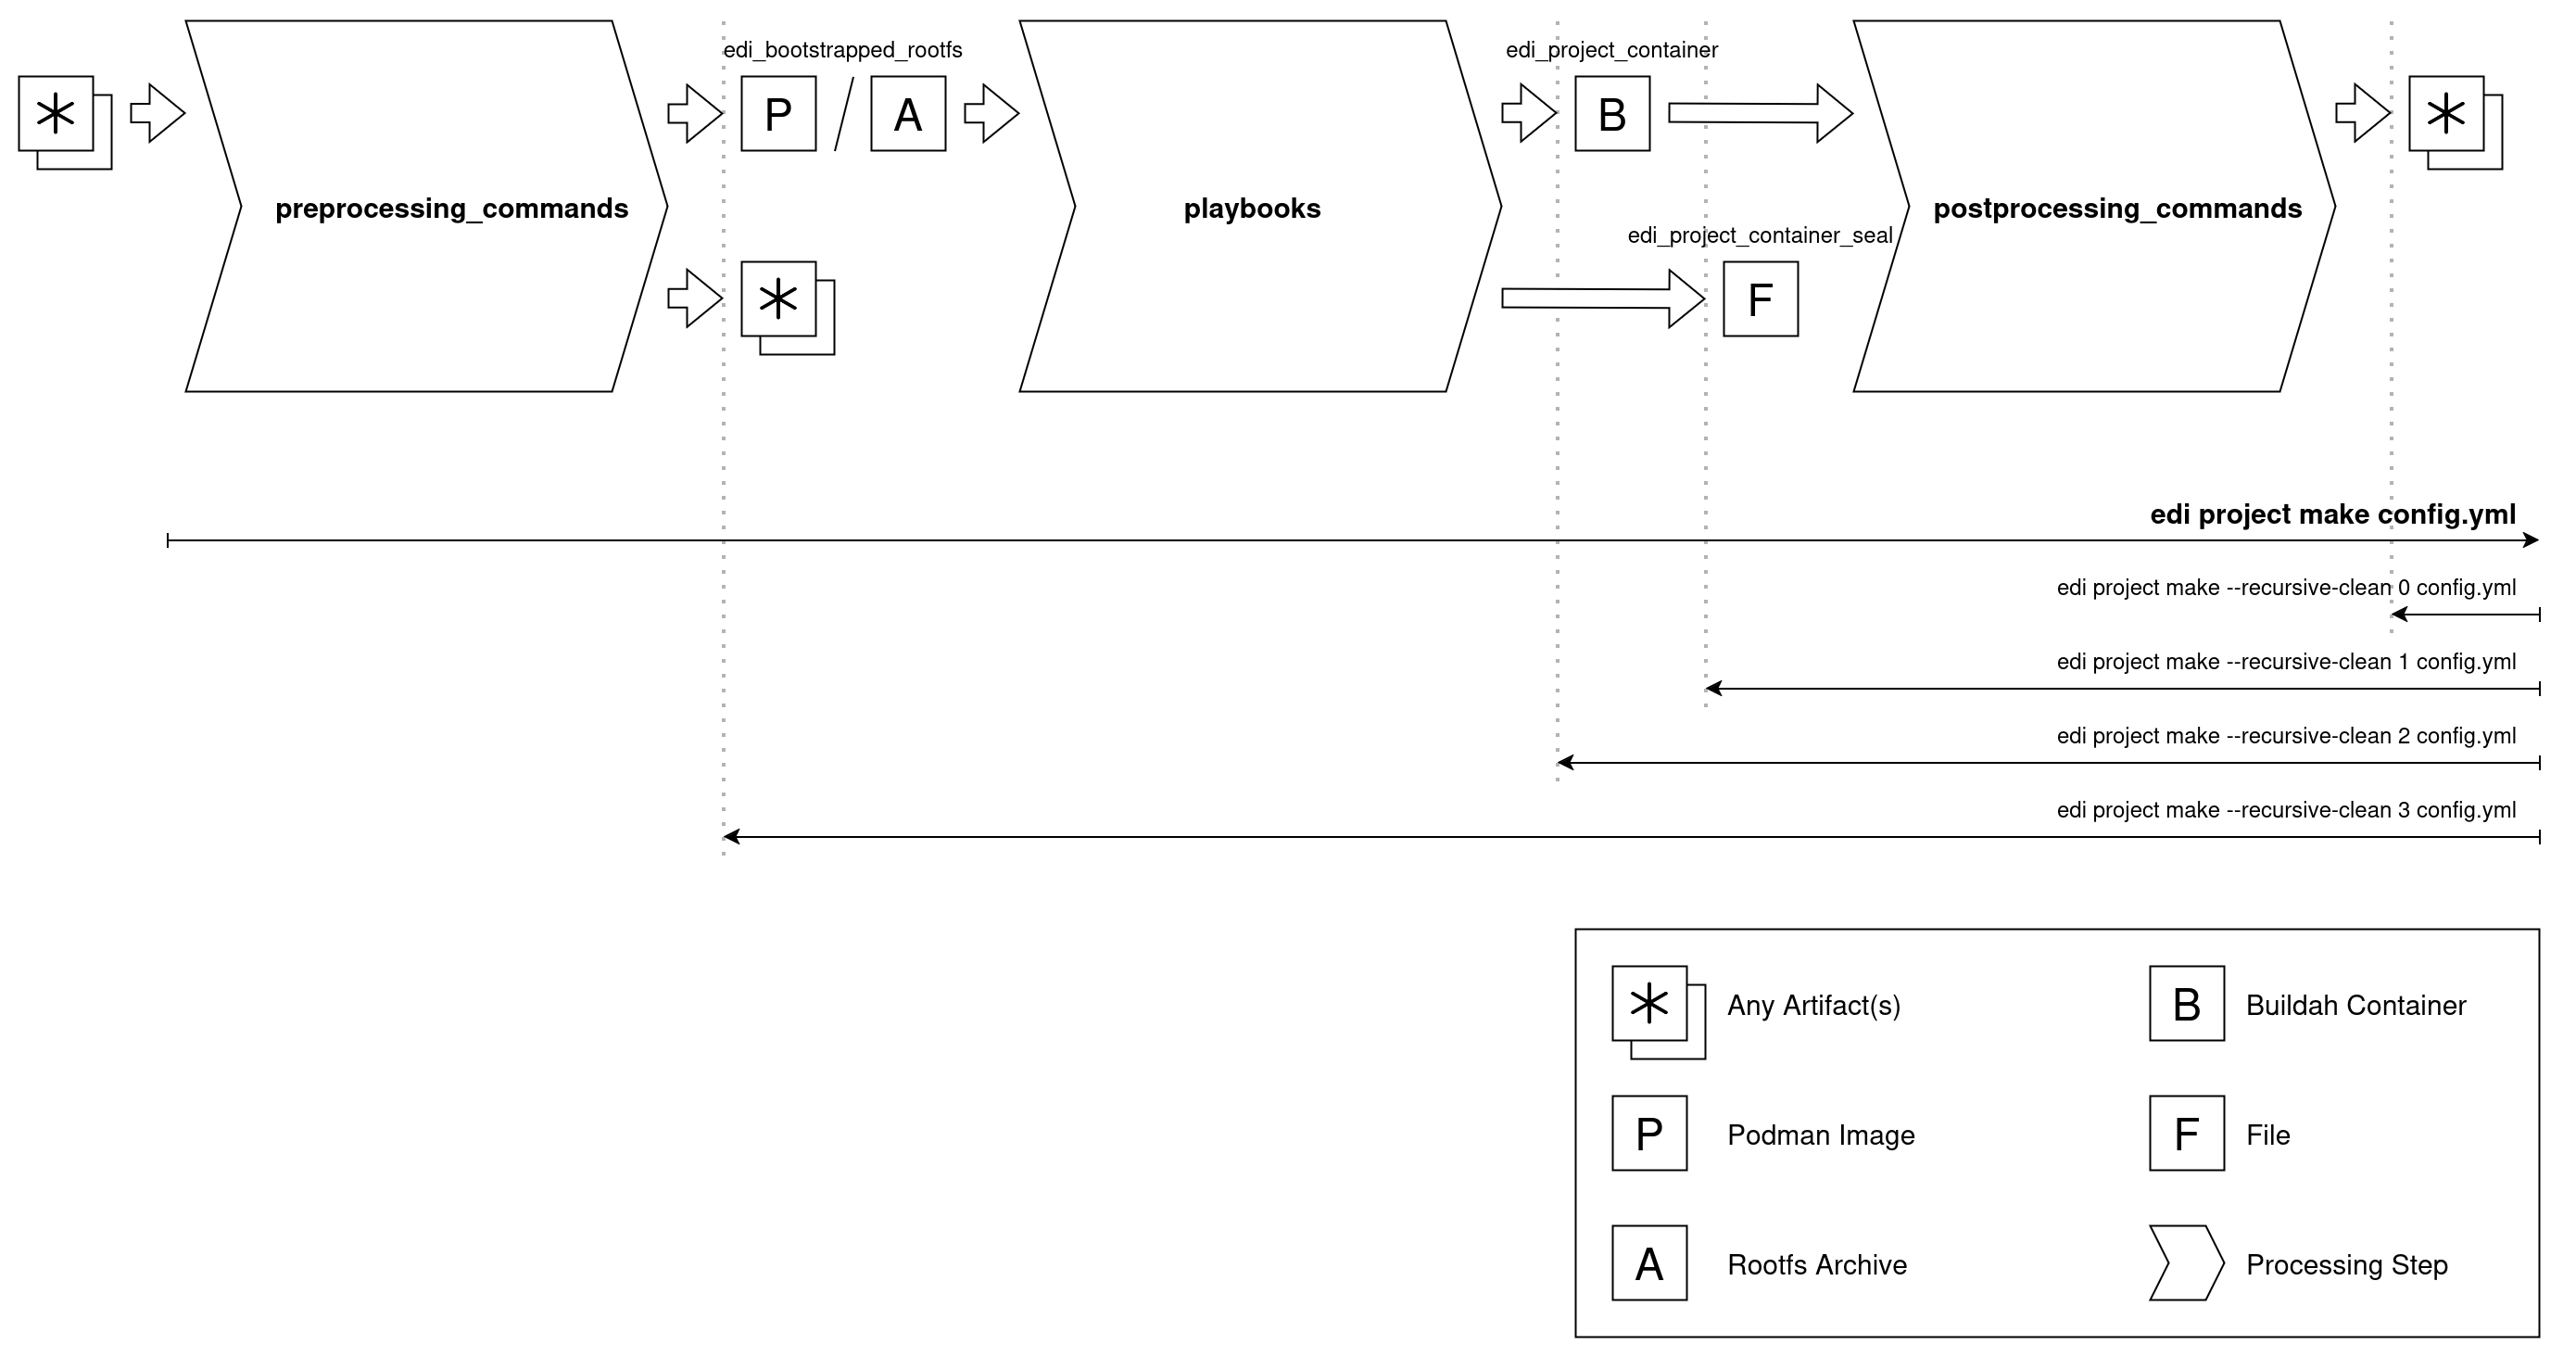
The new edi v2 workflow is based on three processing steps:
- The
preprocessing_commandsprepare a root file system archive or Podman image that serves as the basis of the intermediate Buildah container we want to create. In our configurationmmdebstrapis being used for this purpose and it creates a root file system from the packages taken from a Debian repository. - During the second processing step an Ansible
playbookis being applied, and it modifies the initial root file system according to our needs. With workflow v2 it is preferred to have just one Ansible playbook. The playbook can be enriched with Ansible roles and collections. In our configuration the collection debian_setup gets pulled in as agitsubmodule. - The last processing step uses
postprocessing_commandsto turn the container root file system into whatever artifacts we need.
Modifications and Debugging
We go back into our project configuration:
cd ~/edi-workspace/edi-pi
The heavy lifting is done using Ansible playbooks. In case something goes wrong, we can jump into the Buildah container and take a close look at the failed element:
lueschem@u2404:~/edi-workspace/edi-pi$ buildah ps
CONTAINER ID  BUILDER  IMAGE ID     IMAGE NAME                       CONTAINER NAME
9a26c19b995a     *                  scratch                          edi-689892bd-429715a5
lueschem@u2404:~/edi-workspace/edi-pi$ buildah run edi-689892bd-429715a5 bash
root@9a26c19b995a:/#
exit
To force a re-build of artifacts, they can be recursively cleaned:
edi -v project make --recursive-clean 1 pi4-gitops-v2.yml
The --recursive-clean 1 is especially helpful as it does not delete the Buildah container artifact. A subsequent
edi -v project make pi4-gitops-v2.yml will then not have to re-build and re-configure the entire container. Instead it
will use the existing one. The assumption here is that the Ansible playbook is idempotent and can be re-applied to the same
Buildah container. If this is not the case e.g. due to a modification, the container can also get erased using
edi -v project make --recursive-clean 2 pi4-gitops-v2.yml.
In case the playbook fails at a certain step, we can fix it and jump in again in the middle of the playbook:
edi -v --start-at-task "Install packages that are essential for running on bare metal." project make pi4-gitops-v2.yml
Creating a Development Container
The Debian development happens in a self-contained manner. If we want to build an application for Debian bookworm then we develop within a Debian bookworm environment. In our case we make use of a Debian bookworm container that is as similar as possible to the deployment that we do on our target system (this is why I sometimes call it digital twin).
cd ~/edi-workspace/edi-pi
edi -v project make pi-cross-dev-v2.yml
OCI ecosystem
The
ediv2 workflow makes use of Buildah and Podman. The resulting container images are easy to share within a corporate environment and can get consumed by various OCI compliant tools.
The result of the above command is a Podman image. The tool distrobox can turn it into a convenient development
container with a shared home folder:
source artifacts/pi-cross-dev-v2_manifest
distrobox create --image "${podman_image}" --name pi-twin-bookworm --init --unshare-all --additional-packages "systemd libpam-systemd"
distrobox enter pi-twin-bookworm
Even GUI applications can be launched from with that Podman based container.
distroboxWith the
ediv1 setup, container integration was carried out on the basis of LXD. The integration offered bydistroboxon the basis of Podman goes far beyond whatedioffers with the v1 workflow.
Sharing
Finally, we want to make the Podman image available to our coworkers and the CI infrastructure.
Again we change into our project folder and make sure that the Podman image is available:
cd ~/edi-workspace/edi-pi
source artifacts/pi-cross-dev-v2_manifest
podman images
Now we push the image to our Docker registry (here Artifactory):
podman login artifactory.example.com
podman tag "${podman_image}" artifactory.example.com/some-oci-repo/"${podman_image}"
podman push artifactory.example.com/some-oci-repo/"${podman_image}" -f=oci
Our coworker can then pull the image using his preferred tool:
docker login artifactory.example.com
docker run -it artifactory.example.com/some-oci-repo/IMAGE_NAME bash
Generating Machine Readable Documentation
Ever heard of SBOMs? They might soon be required for your project. Here is how we can create one:
sudo bash -c "curl -sSfL https://raw.githubusercontent.com/anchore/syft/main/install.sh | sh -s -- -b /usr/local/bin"
systemctl --user enable podman.socket
systemctl --user start podman.socket
buildah commit edi-689892bd-429715a5 pi4-image:latest
syft pi4-image:latest --scope all-layers --output cyclonedx-json > sbom.json
E.g. with Firefox we can take a look at the generated SBOM (example):
firefox sbom.json
Generating Human Readable Documentation
SBOMs are perfect for subsequent automated processing. However, humans also might want to take a look at the content of an OS image. Here is how we can generate a nice pdf document based on the changelogs delivered by the Debian packages:
sudo apt install texlive-latex-recommended texlive-pictures texlive-latex-extra texlive-xetex latexmk
cd ~/edi-workspace/edi-pi/artifacts/pi4-gitops-v2_documentation/
for i in {1..2}; do make PDFLATEX=xelatex latexpdf; done
Now we can take a look at the image content (example):
firefox ./_build/latex/pi4-gitops-v2-bookworm-arm64.pdf
Outlook
The v2 workflow is already working very well and I am confident that I will be able to switch all project configurations to the v2 workflow once I have started the transition to Debian trixie. At the moment there is still a guaranteed lack of documentation and there will still be some rough edges. Constructive feedback is very welcome!
Leave a comment