A New Approach To Operating System Image Generation
| Update - Debian Buster - 23. August 2019 |
|---|
| Debian buster got released more than one month ago. As usual it is another great release and therefore I decided to upgrade edi-pi to buster. |
An advertisement for the latest edi feature could read as follows:
“Conveniently generate your tailored Linux image and get a (cross)
development container for free!”
Here is how this looks like for the Raspberry Pi 3:
Given you have installed the tool edi according to
this instructions
(please take a careful look at the “Setting up ssh Keys” section since you
will need a proper ssh key setup in order to access the container or
the Rasperry Pi using ssh) and cloned the edi-pi project configuration
repository from GitHub:
git clone https://github.com/lueschem/edi-pi.git
cd edi-pi
and installed a few extra tools:
sudo apt install e2fsprogs dosfstools bmap-tools
To generate the Mender update artifact, the mender-artifact tool is required. Unfortunately it did not make it into the Ubuntu Bionic apt repositories. Luckily this package comes with a small number of dependencies and therefore it is without risk to download it from Debian and install it on Ubuntu Bionic:
sudo dpkg -i mender-artifact*.deb
| Update - Debian Buster/Ubuntu Focal - 10. November 2020 |
|---|
Starting from Debian Buster and Ubuntu Focal you can install mender-artifact as follows: sudo apt install mender-artifact |
You are now ready to generate a minimal pure Debian buster arm64 image for the Raspberry Pi 3 using a single command:
| Important Note |
|---|
| OS image generation operations require superuser privileges and therefore you can easily break your host operating system. Please ensure that you have a backup copy of your data. |
sudo edi -v image create pi3-buster-arm64.yml
The resulting image can be copied to an unmounted SD card (here /dev/mmcblk0) using the following command:
| Important Note |
|---|
| Everything on the SD card will be erased! |
sudo bmaptool copy artifacts/pi3-buster-arm64.img /dev/mmcblk0
Once you have booted the Raspberry Pi 3 using this SD card you can access it using ssh (the access should be granted thanks to your ssh keys):
ssh pi@IP_ADDRESS
or via local login using keyboard and monitor (the password for the user pi is raspberry).
You might think: “So what? There are plenty of scripts that can achieve this.”
This is correct and I even got inspired by those scripts. But I wanted to take the approach a step further by doing certain things a bit different:
The Command Pipeline
OS image generation always involves time consuming steps that get
boring when executed over and over again. Having this in mind, an important
design goal of edi was to separate those steps in order to make sure that if a
step fails, that the artifacts from the preceding steps remain valid.
This helps to speed up the development of new OS images
because the whole image can be developed step by step. While doing the later
steps edi will directly reuse the artifacts of the previous steps without
consuming time to re-generate them.
The resulting design is a pipeline of consecutive sub commands that looks like this:

edi does not even try to be clever about (intermediate) artifacts:
If the requested artifact is present it will take it, otherwise it will try to
generate it. If you want to force the re-creation of selected artifacts,
you can tell edi to recursively delete the artifacts of the given and
the N preceding sub commands:
sudo edi image create --recursive-clean 5 pi3-buster-arm64.yml
This command (here N=5) will remove most of the artifacts (up to and including the container) but e.g. the bootstrap artifacts will remain untouched.
A re-creation of the OS image with the same command as above will be a lot faster since the bootstrapping gets skipped thanks to already existing artifacts.
The Toolbox
When creating OS images edi does not build upon a pre-built iso image but
it starts from scratch using debootstrap. This has a beneficial effect
especially for embedded devices since you can control all the installed
packages right from the start and you do not have to remove any unwanted
packages afterwards.
Instead of customizing the minimal root file system within a chroot edi
makes use of a LXD container.
This has a positive impact during the
engineering phase since a lot of things (including service startup and
network setup) can already be fine tuned within the container.
The customization of the image happens within the LXD container by
means of Ansible.
When all the customization has been successfully completed, the LXD
container gets exported and some additional custom scripting converts
the root file system into the desired image format.
The Vital Side Products
For embedded cross development it is desirable to make use of a cross compiler to reduce compile time. Thanks to the container based setup a single command is sufficient to generate a matching cross toolchain:
sudo edi -v lxc configure edi-pi-cross-dev-buster pi3-buster-arm64-cross-dev.yml
Furthermore and emulated arm64 container can be built with the following command:
sudo edi -v lxc configure edi-pi-arm64-dev-buster pi3-buster-arm64-dev.yml
| Note About Emulation |
|---|
Please be aware that the emulated container is not recommended for daily work. The emulation causes a speed penalty and some things are not going to work as expected (e.g. strace, ifconfig or the ssh daemon). Furthermore edi-pi will disable the startup of services within emulated containers. |
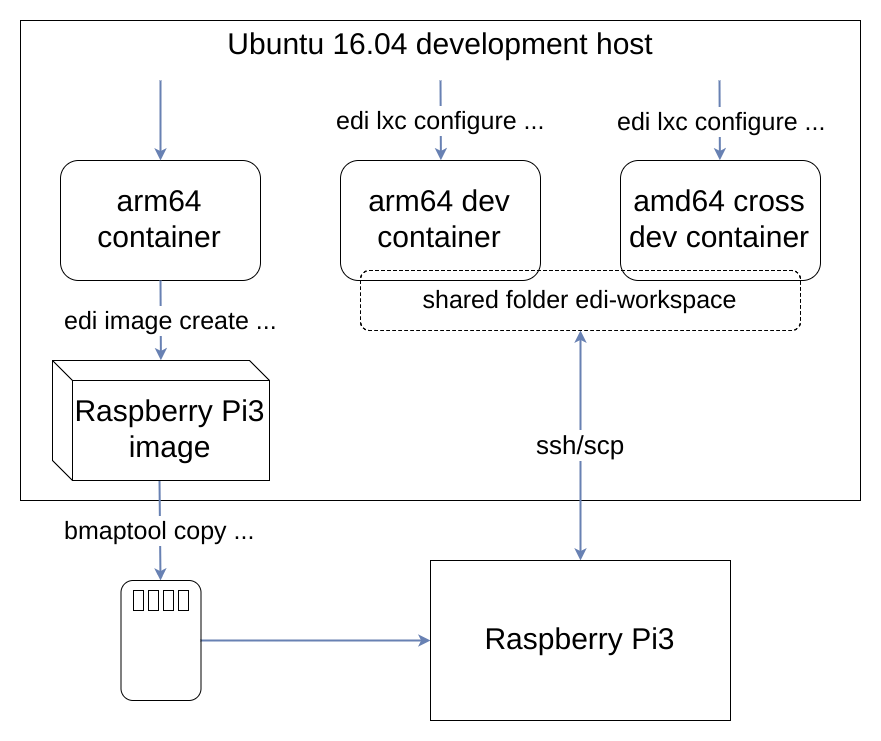
The following picture shows an overview of the artifacts we have seen so far:
Now that we have a running Raspberry Pi and a cross development container we can do our first steps to design a highly sophisticated application:
The Workflow
First we enter the cross development container (the initial password is ChangeMe!) and change the password:
lxc exec edi-pi-cross-dev-buster -- login ${USER}
passwd
Then we create a folder within the folder that is shared with the host operating system:
mkdir -p ~/edi-workspace/hello-pi
cd ~/edi-workspace/hello-pi
Now we write our groundbreaking application:
cat << EOF > hello.cpp
#include <iostream>

int main()
{
    std::cout << "Hello Pi!" << std::endl;
    return 0;
}
EOF
Since we are not sure whether we got everything right in such a complex scenario we compile and test it in the container first:
g++ hello.cpp -o hello-test
./hello-test
Now we are confident that it is worth compiling the application for the target system:
aarch64-linux-gnu-g++ hello.cpp -o hello-pi
Next we leave the cross development container:
exit
And we deploy the application to our Raspberry Pi:
scp ~/edi-workspace/hello-pi/hello-pi pi@IP_ADDRESS:
Finally we run it there:
ssh pi@IP_ADDRESS
./hello-pi
In the real world scenarios I have encountered so far it even turned out that most of the development and testing happens within the container.
If the application relies upon hardware interfaces such as serial devices or network interfaces you can conveniently forward such interfaces into the LXD container and from within the container the world then looks pretty similar to the real world on the target device. If the host is capable of performing real time tasks then you can even test out real time stuff from within the container.
The cross compilation and testing on the target device can then be automated and the developer does not have to fiddle around with real hardware during most of his development time.
The Configuration
Reusability was a key quality attribute for the design of edi.
Therefore the edi scripting is kept separate from the project specific
configurations. For increased readability an edi project is written
in yaml and to allow parametrization the parsing of configuration files
applies the Jinja2 template engine.
The configuration for the target image can be displayed using the following command:
edi image create --config pi3-buster-arm64.yml
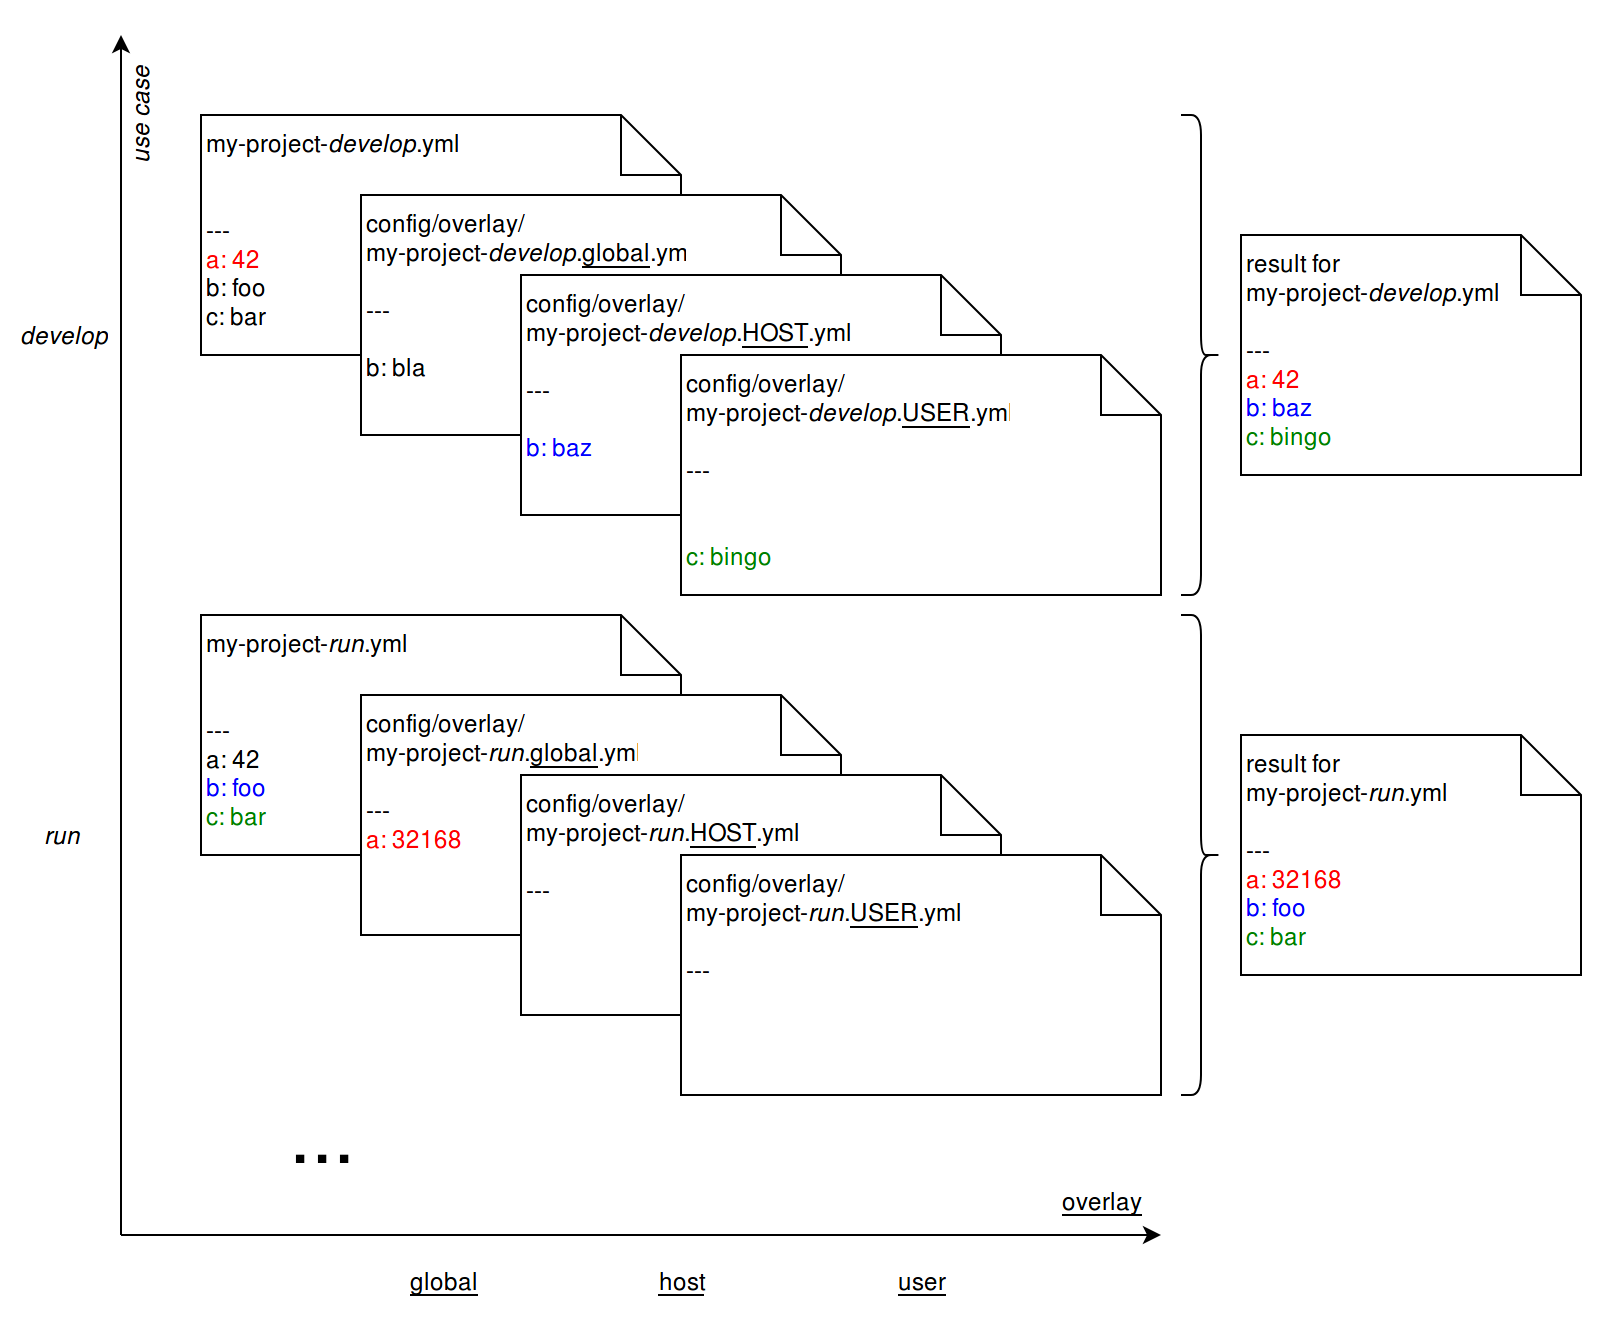
As depicted above, the edi-pi project does not only allow you
to generate a target image. You can also produce artifacts that are
useful for development and testing. To support multiple use cases with
a single project configuration edi allows you to fine tune each use
case using overlays:
Finally plugins are used to make the different assets even better sharable across multiple project configurations. The plugins applied to the Raspberry Pi 3 image can be displayed using the following command:
edi image create --plugins pi3-buster-arm64.yml
Conclusion and Acknowledgement
The setup of the edi-pi project configuration was pretty straight
forward for several reasons:
- There are great communities around Debian and the Rasperry Pi that are providing plenty of useful information, source code and binaries.
- The ARM community made huge headway with regards to mainline Linux kernel support. Therefore - with the appropriate device tree binary - a generic Debian kernel can be used on the Raspberry Pi 3 (However, for a production image it might be a good idea to ship a tailored kernel).
- Great tools like Ansible make it easy to customize the image where needed.
A big thanks goes to all the people that made this possible!
The really cool thing about the above setup is that you can do most of your image and application development within a LXD container. The matching cross development container comes as an (almost) free gift.
The approach outlined above is not at all limited to the Raspberry Pi 3. You can easily adapt it to other popular boards such as the BeagleBone black, the Compulab IoT Gateway or any other board that is powerful enough to run Debian or Ubuntu.
Although edi was initially designed for embedded projects it is
generic enough that it could also serve in other areas: For example
I am pretty sure that it is feasible to produce fully tailored images
for Amazon, Azure, or name your favourite cloud provider here!
What do you think about the above approach? Your feedback is appreciated!
Reference List
I came across a few cool things while preparing this blog post:
- rpi23-gen-image: advanced Debian bootstrap script for the Raspberry Pi 2 and 3
- raspi3-image-spec: Debian buster Raspberry Pi 3 image generation configuration
- Packer: automated machine image building
Furthermore this blog post is based on my previous posts:
- The Bright Future of Containers for Embedded Software
- Compiling for Embedded Debian Target Systems
- Cross Compiling for Raspbian
If you are interested in the gory details you can continue reading here:
Leave a comment